Are you looking for the best local wall tilers near you? You’re in the right place.
Post a job and local wall tile fitters will get in touch to provide a quote for your wall tiling project.
Wall tiling is a great option for walls that will get wet or dirty.
Perfect for the bathroom or kitchen, particularly in showers, around baths, splashbacks and above sinks or work surfaces in the kitchen as a hardy surface to withstand the moisture and grime of everyday life.
Contents
What process will wall tilers near me typically follow?
1. Preparing the surface for wall tiling
Your wall should be clean, dry, smooth and flat before it’s ready to have wall tiles installed.
Freshly plastered walls are perfect. Naturally this will be the ideal surface to begin installing wall tiles because the finished plaster will be smooth, level and free of imperfections.
But often this isn’t the case.
Your wall tiler will remove any existing tiles and scrape off any old adhesive.
If your walls are painted, your tiler will remove any loose or flaky paint first.
Next, your wall tiler will repair any cracks or imperfections that might affect the wall tiles being fitted.
2. Wall tile layout
Your wall tiler will mark the centre of the wall and a horizontal and vertical reference line from the centre to ensure vertical joints align and the tiles are laid horizontally.
Without taking the time to create these guides, it’s easy for joints to wander as the wall tiles are fitted.
Wall tilers usually use a spirit level or a laser level to help maintain alignment as wall tiles are fixed in place.
It’s important to avoid small slithers of tiles being left at the edge of walls which is why the set out process is so important. Small, uneven slithers of tiles at the edges of walls are unsightly and difficult to work with.
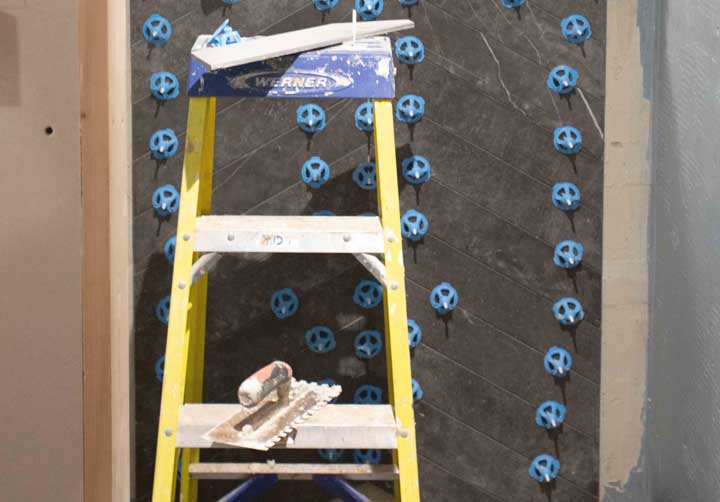
3. Tile adhesive is applied to the wall
Your wall tiler will advise on the best adhesive to use. It’s important to use the correct adhesive as they do differ depending on your situation. Factors like the material of your tile and how much moisture your wall tiles will be exposed to affect which adhesive should be used.
Wall tilers use a trowel to apply the adhesive. First with the flat side of the trowel and then with the notched edge of the trowel leaving the adhesive spread in vertical channels to provide maximum adhesion.
4. Wall tile installation
The wall tiles are pressed firmly on the wall so they are gripped by the tile adhesive. The tiles are laid in rows across the reference lines on the wall, once applied, tile spacers are inserted to ensure even tile alignment.
As the tiler approaches the edge of the wall, they cut tiles for the smaller gaps.
5. Grouting the wall tiles
Once the adhesive has set, which is typically 24 hours or so but can vary depending on the type of adhesive used, it is time to grout.
Your wall tiler will mix the grout as per the grout manufacturers recommendations. Then they’ll use a rubber float to apply the grout pressing it into the gaps between your wall tiles.
Finally, excess grout is wiped off with a damp sponge before it sets.
6. Cleaning the wall tiles
After the grout has set but before it fully cures a clean damp sponge is used to remove the remaining grout haze from the tiles.
You should give enough time for the grout to completely set before exposing it to moisture, don’t turn that shower on yet!
7. Finishing touches to your tiled wall
Local tilers will use silicon to seal the edges, corners, and around fixtures like baths, kitchen worktops, or door frames.
One final polish and clean by your wall tiler and your new tiles should be looking lovely and shiny.
Free Service
What are the pros and cons of different wall tiles?
Above we talked about the process of installing wall tiles, now let’s look at the main options in terms of tiles and their pros and cons.
| Tile material | Pros | Cons |
| Ceramic | Budget-friendly flooring option with a wide array of stylish designs and colours. Low-maintenance and stain-resistant, making it suitable for various spaces. |
While cost-effective, ceramic tiles may be susceptible to chipping and cracking under significant impact. |
| Porcelain | Durable and dense, making porcelain tiles an excellent choice for high-traffic areas. While durable, quartz tiles may be pricier than alternative options and may lack the heat resistance of some natural stones. |
Though more expensive, the hardness of porcelain tiles can pose challenges during installation. |
| Glass | Modern aesthetics and light-reflecting qualities enhance the visual appeal of spaces. Resistant to stains and moisture, offering a sleek and contemporary flooring option. |
Fragility and installation complexities may be considerations when opting for glass tiles. |
| Marble | Timeless and luxurious appearance, featuring unique veining patterns.
Versatile, suitable for both formal and informal settings. |
Elevated cost and susceptibility to scratching and etching necessitate regular maintenance efforts. |
| Granite | Exceptional durability and resistance to scratches and heat.
Low-maintenance and long-lasting, adding value to spaces. |
Considerable expense and limited colour options might influence decision-making. |
| Limestone | Elegant aesthetics with a soft and warm underfoot feel. | Porosity and staining susceptibility require regular sealing, and it may not match the durability of other materials. |
| Travertine | Natural and distinctive appearance, suitable for both indoor and outdoor applications. | Porous nature and susceptibility to scratching may necessitate ongoing maintenance efforts. |
| Slate | Rustic and natural appearance with slip-resistant qualities.
Stain-resistant, making slate a durable option. |
Uneven surfaces and limited colour options may impact aesthetic choices. |
| Natural Stone | Unique and varied aesthetics contribute to the overall appeal of spaces.
Durable with potential to enhance property value. |
Sealing and maintenance requirements may be necessary, and certain types may have limited availability. |
| Natural Clay | Warm and rustic aesthetic with eco-friendly attributes.
Known for durability and longevity. |
Has potential for cracking, and colour options may be limited. |
| Quartz | Non-porous, stain-resistant surface with minimal maintenance needs.
Wide variety of colours and patterns available. |
While durable, quartz tiles may be pricier than alternative options and may lack the heat resistance of some natural stones. |
| Get quotes | ||
Tip: Consistency is key. When purchasing tiles, be sure they originate from a single batch to maintain uniform colour, as variations may occur between different batches.
Free Service
Wall tiler FAQ’s
Below we’ve answered the most common questions people ask about having their walls tiled.
How long does it take a wall tiler to tile a wall?
A good wall tiler will tile most walls in 1-3 days.
If your wall tiling project is particularly large or you are using tiles that take longer to fit such as herringbone tiles, then it could take a bit longer.
Can I use floor tiles on walls?
It depends on the weight of the tiles and the substrate of the wall they are being fitted on.
Floor tiles are often thicker and heavier than wall tiles because they need to withstand foot traffic. As such there are some types of floor tiles that are too heavy to fit on a wall, they may fall off over time.
The wall substrate also affects whether you can fit floor tiles to the wall. Plasterboard for example is naturally weaker than a solid rendered wall, as such the maximum weight per square metre it can safely cope with is lower.
If you have a particular floor tile in mind you want to install on your wall, consult your local wall tiler as each situation should be checked carefully.
Do I need to replaster the walls before tiling?
Not necessarily.
If your wall is in a reasonable condition, a good local wall tiler will generally be able to work with it by repairing cracks or using tile adhesive to smooth out uneven walls to a certain degree.
Otherwise, perhaps the walls will need to be plaster skimmed first. The benefit of doing this is it makes the tiling process easier, and the final quality of tiling will be better.
Can a wall tiler tile straight onto plasterboard?
Yes, it is very common to tile straight onto plasterboard.
Adhesive can be applied directly to the plasterboard and the tiles directly to the adhesive.
The only shortcoming of tiling on plasterboard is the amount of weight it can hold. There is a maximum amount of weight it can hold.
Bare plasterboard can hold a maximum weight of 32kg per square metre and skimmed plasterboard can hold a maximum of 20kg.
If you’re tiling a wet area, like a shower, you may need to take extra steps to waterproof the plasterboard, such as using moisture-specific plasterboard and a waterproof primer.
Your local wall tiler will advise on the most suitable course of action.
Can you tile a damp wall?
No, it is not a good idea to tile onto walls that have damp problems.
First solve the root cause of the damp. Once that is rectified then it is safe to proceed with wall tile installation.
If your wall tiler tiles on a damp wall, you’re likely to experience problems with tile adhesion. If you suspect your house has damp problems, this damp proofing guide might be worth a read.
Can you tile a wall that isn’t flat?
Yes, it is possible to tile a wall that isn’t flat, but there are some obstacles to overcome.
Depending on how uneven the wall is the ideal solution is to try to make it as flat as possible before applying wall tiles.
Possible solutions are to repair any cracks or imperfections, plaster the wall, or ask your wall tiling contractor whether backer boards can be used to solve the issue.
Good wall tilers are skilled enough to use adhesive to level the surface. But there are limitations as to how much this can improve the level of the wall even when using adhesives designed specifically for thick bed application.
A final word is on tile choice. Uneven walls, or walls with slight curvature are not suitable for large format tiles because the joints are further apart and as such cannot hide the curvature of the wall.
Mosaics are a good choice to hide imperfections on uneven walls.
How do I find a good wall tiler near me?
We can help you fnd local wall tilers in your area. Simply post a job, enter a few details about your project, and multiple wall tilers will get back to you to discuss your project and arrange a quote.
How long does it take a wall tiler to tile a wall?
Good tilers will tile most walls in 1-3 days. If your project is quite large or complicated, it could take longer.
What information will a wall tiler need from me?
Wall tilers near you who are interested in your project will find it useful if you provide a few details about the project, such as:
- The tiles you’ve chosen
- Measurements of the wall
- Pictures of the current condition of the wall
- The grout colour you’d prefer
So there we have it, hopefully the above information has helped you understand the process of wall tiling in more detail and the different options available.
Now, if you’re ready to get started, post a job to get quotes from wall tilers near you.
Free Service